Beginner's Guide to Agent2Agent (A2A) Communication: Build a DuckDuckGo Web-Search Agent with Python & LangGraph
In this beginner's guide, you'll learn how to implement Agent2Agent (A2A) communication by building a DuckDuckGo web-search agent using Python, FastAPI, and LangGraph. Let's integrate the DuckDuckGo search API and master A2A agent development best practices.
What is Agent-to-Agent (A2A) Communication & Why Use It?#
Agent 2 Agent(A2A) communication is a way for people and agents to communicate with other agents. In simple words, you can think of it as a standard of communication (like HTTP) for agents and clients. This standard of communication essentially creates a network of agents, with possibility of self-discovery and self-organization.
If we take Model-Context-Protocol(MCP), we can say that it beefs up one agent with a lot of tools, but eventually, it'll become super bloated and will increase mistaces, tool misuse, etc. There're ways to handle it(e.g tool lookup), but it's still makes MCP a bit messy.
A2A on the other hand, distributes horizontally the load of tool usage. Instead of stuffing one agent with a lot of tools, we can distribute the load of tool usage to multiple agents, and assign each agent their specific role.
You can think of MCP as an individual developer, and A2A as a company with multiple employees—there'll be delegators, developers, designers, etc.
With that in mind, let's jump into the implementation of simple A2A agent. Let's do something useful, and implement a tool that can search the web for links for us.
Using the A2A Template with Python & LangGraph#
If I'll share all of the code for the project, it'll become a book :) A2A is quintessence of many different frameworks and paradigms, so it's not that simple to just share parts of code. Also, we have LLMs and what not, so if you have very specific question - just ask on a code, or write to me, happy to help.
So, let's start with cloning(using) our A2A template: Use our template
You should then clone your forked repository to your local machine.
git clone https://github.com/{your-username}/a2a-template-langgraph.git
Next is to initialize the project so you can start working with it.
cd a2a-template-langgraph
uv install
In case you want to use persistance with PostgreSQL, you need to startup a postgres:
docker-compose up -d postgres
Now, we need to create a .env file and set the following variables:
OPENAI_API_KEY={your_openai_api_key}
OPENAI_MODEL=o4-mini # Optional, defaults to o4-mini
And, that's it! You can now start the project by running:
python main.py
You can do a curl to see if the server is running:
curl http://localhost:10000/.well-known/agent.json
{"name":"LangGraph Agent","description":"A versatile agent...
Perfect! Before we push it to production, of course, we need to add some functionality to it.
Let's go first over logic and how it works in general, and what core components are present.
Understanding the structure of A2A#
Tasks and Messages#
In core of A2A communication lies a task and a message.
The structure corresponsds to something like this:
- Task
- Status
- State
- Message
- Role
- Parts
- Artifacts
- Parts
- Index
- Append
- Status
Each task contains a status with possible message, and artifacts. This will be our main data types to work with.
With tempalte you don't really need to define it, but it's good to know the structure.
Agent#
Now we can look at internal part that you're most familiar with - agent.
There's no limit on which framework you can use in A2A, so you can pick any. Agent is more abstract part, and just needs to receive queries(text to reply to). This means you can also easily swap them later, if you don't like functionality of one.
Template uses LangGraph, but feel free to have a look at other examples here: https://github.com/google/A2A/tree/main/samples/python/agents.
For LLM, we'll be using gpt-4.1(big context, good quality, and not too expensive).
Feel free to explore .a2a_service/agent.py. But one item we're most interested is SYSTEM_INSTRUCTION.
# .a2a_service/agent.py

from langchain_core.tools import tools
...

class Agent:

    SYSTEM_INSTRUCTION = """
    You are a helpful AI assistant that can answer questions on a wide range of topics.
    Your goal is to provide accurate, helpful information to the user.
    """
This is a system instruction for our agent. It's a good place to define what the agent is for, and what it's capable of.
While defining system instruction, keep in mind the role of the agent, if he'll be dedicating tasks to other agents. In our case, we're creating a "worker", he'll only receive a task and will need to return a result or ask for clarifications. We'll be looking at other types of agents in future articles, but for now, let's keep it simple.
Other than that, system instructions work the same way as in any other LLM.
Now we have our "working gear", let's see how we actually juggle requests from clients.
Agent tools
Besides system instruction, agent also has tools, it's super easy to define them. Template already comes with mocked tool, and it's easy to define your own. Just add new file, tag it with @tool, and add it to the tools list in Agent class.
Juggling tasks with Task Manager#
Task manager is a core component that will be handling requests from clients. It's your job to define how it works, if you can accept parallel requests, how you throttle them, etc. Our template provides a simple persistant(PostgreSQL) and non-persistent(in-memory) task manager.
Memory management
Every task manager should have some type of memory. Non-persistant task manager(or mostly in-memory) are basically good for either really simple use cases, or testing.
I really encourage you to use persistant task manager, as it'll make your life easier along the way :)
Synchronous vs Streaming Task Managers
When it comes to handling tasks, you might also consider the difference between synchronous and streaming task managers.
Synchronous task managers process tasks as http requests, without returning results in realtime, but waitign for whole reply to be completed, and then returning it.
Streaming task managers are returning results in realtime, as they come in. In practice it's usually parts of LLM responses, files, etc.
For now, we recommend sticking to simplicity with synchronous task managers.(and also our template is not supporting streaming yet)
Agent Card#
Agent card is a way to define what the agent is capable of. It's a way to expose functionality of the agent to the outside world.
We define it in main.py file
We'll cover agent card in more detail in future articles, here's a quick onboarding:
- Name, Description, Version - basic info about the agent, name, description that will be visible for other agents and clients, and version of the agent(in semver).
- Default input and output modes - which content types the agent can handle on input and output, for now we're sticking to text(
["text", "text/plain"]) - Capabilities - list of capabilities the agent has, we'll cover this in more detail in future articles.
- Streaming - whether the agent can handle streaming of data(a.k.a if Task Manager knows how to stream)
- pushNotifications - if agent supports push notifications when long running tasks are completed
- Skills - Detailed information about skills the agent has, this is really important part, as it'll be used by other agents to find out what the agent can do.
agent_card = AgentCard(
    name="LangGraph Agent",
    description="A versatile agent that can answer questions using search tools",
    url=f"http://{HOST}:{PORT}/",
    version="1.0.0",
    defaultInputModes=Agent.SUPPORTED_CONTENT_TYPES,
    defaultOutputModes=Agent.SUPPORTED_CONTENT_TYPES,
    capabilities=capabilities,
    skills=[skill],
)
If you define new functionality you want other clients or agents to know, you most likely want to expose it via skills, e.g:
temperature_check_skill = AgentSkill(
    id="temperature_check",
    name="Temperature Check",
    description="Checks the temperature of the water",
    tags=["temperature", "water"],
    examples=["What is the temperature of the water?", "Is the water too hot?", "Is the water too cold?"],
)
Now, we can add this skill to our agent card:
agent_card.skills = [temperature_check_skill]
Obvious that you need define what the agent really can do, otherwise you'll receive requests to do something you cannot do.
A2A server#
Last part of A2A framework is the server that powers everything. As with Agent, you can pick any framework you want, as well as language. We're sticking to python and FastAPI.
A2A server is available in .a2a_service/server.py file.
Modifying the template to be useful#
Now that we know the setup, we can modify the template to be useful.
In our case, let's update search tool to use DuckDuckGo and really do a web search.
Let's install duckduckgo-search:
uv add duckduckgo-search
And now update search tool:
from langchain_core.tools import tool
from typing import Optional
from duckduckgo_search import DDGS

@tool
def search_web(query: str, max_results: Optional[int] = 5) -> str:
    """Search the web for information using DuckDuckGo.

    Args:
        query: The search query.
        max_results: Maximum number of results to return (default: 5)

    Returns:
        Information found from the search.
    """
    try:
        with DDGS() as ddgs:
            results = list(ddgs.text(query, max_results=max_results))

        if not results:
            return "No results found."

        formatted_results = []
        for i, result in enumerate(results, 1):
            title = result.get('title', 'No Title')
            body = result.get('body', 'No Content')
            href = result.get('href', 'No URL')

            formatted_results.append(f"{i}. {title}\n   {body}\n   URL: {href}\n")

        return "\n".join(formatted_results)
    except Exception as e:
        return f"Error performing search: {str(e)}"
Let's start the server and try to ask to search the web:
=========  starting a new task ========

What do you want to send to the agent? (:q or quit to exit): Search me in web "news may 12 2025"

{"jsonrpc":"2.0","id":"3eab69eb046c418e816e406d3e3d93c8","result":{"id":"486fc7f248ab429f91657ef19b3b93ca","status":{"state":"completed","message":{"role":"agent","parts":[{"type":"text","text":"Here are some of the top news round-ups and sources for May 12, 2025:\n\n1. “Monday Morning News: May 12, 2025” (wng.org)\n   – Highlights include:\n....
You'll also see in logs queries to duckduckgo:
INFO:primp:response: https://html.duckduckgo.com/html 200
Perfect! Now we have a working web search tool.
How to test the agent?#
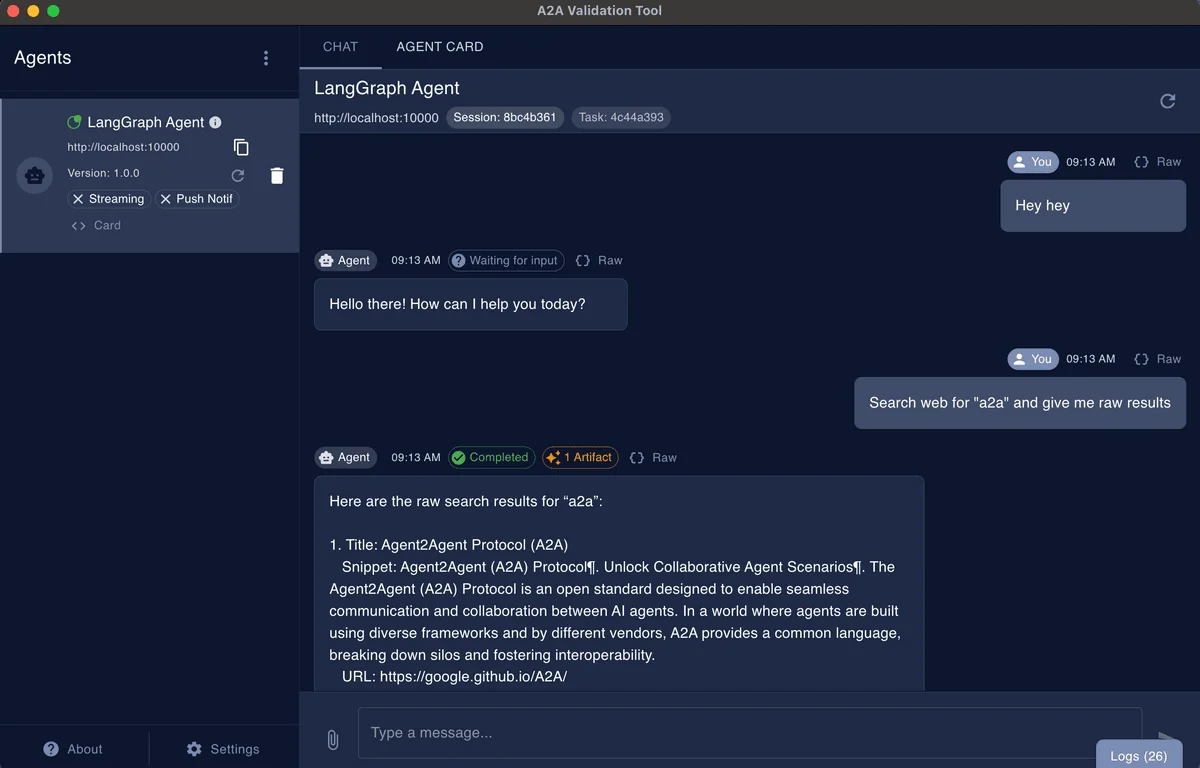
I recommend trying a UI tool called a2a-validation-tool that helps you visually see the results, making them easier to read and share with others. This tool provides a more user-friendly way to examine your agent's responses compared to viewing raw output in the terminal.
Just download the tool from latest release, and run it(instructions how to install for linux are in readme).
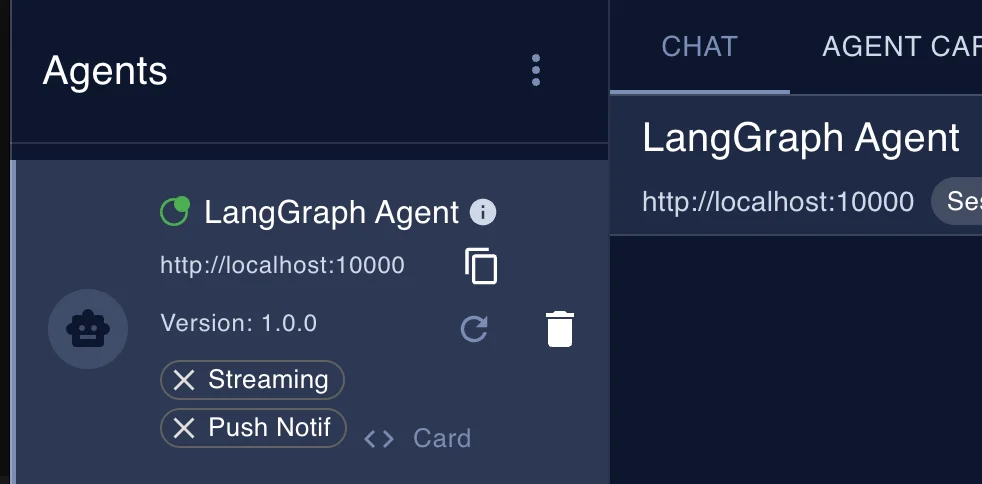
On first start, you should already get a agent on 10000 port, so you can just hit refresh button on it and it should connect and display live information. If everything is working, you should see green circle on the agent card:
You can then click on agent and message window will open, where you can send messages to the agent. Here's testing result from my side:
Now you completed your first A2A agent! Next step will be to explore other types of agents, and how to integrate them in practice.
If you have any questions, feel free to write to me, happy to help :)