Unlock Gemini CLI's Full Potential with Model Context Protocol (MCP)
Key Takeaways#
⚡ Quick Start: Connect Gemini CLI to GitHub via MCP
- Generate GitHub Personal Access Token (read-only)
- Configure MCP in
~/.gemini/settings.json(jump to setup →) - Restart CLI and approve GitHub tools
- Query private repos using natural language
Result: Gemini CLI with GitHub MCP server configured.
Have you ever found yourself using the Gemini CLI and wishing it could do more? While it's powerful for local tasks, its true potential is unlocked when it can interact with external services and APIs. Imagine asking Gemini to review a pull request, pull design assets directly from Figma, or query any other API you rely on in your workflow. This might seem complex, but there's a straightforward solution: the Model Context Protocol (MCP).
This guide will walk you through the entire process, step by step. We'll start with the basics, explaining what MCPs are and how they empower the Gemini CLI. You'll learn how to configure your first MCP server to establish a connection with GitHub. By the end of this tutorial, you'll be able to use natural language commands in your terminal to securely access and retrieve information from your private GitHub repositories, transforming your Gemini CLI into a much more powerful and versatile development tool.
Understanding the Core Concepts: Gemini CLI & MCP#
Before we dive in, let's quickly cover the two key technologies we're working with.
- Gemini CLI: This is your command-line interface for interacting with Google's Gemini models. By default, it's a fantastic tool for local tasks—it can read your files, search through your code, and help you with a variety of development tasks on your machine.
- Model Context Protocol (MCP): This is the magic that lets the Gemini CLI securely connect to external tools and APIs. Think of an MCP as a standardized bridge. Each service you want to connect to (like GitHub, Figma, etc.) can have its own "MCP Server."
The connection between the two is managed by a simple configuration file on your computer: settings.json. This file tells the Gemini CLI which MCP servers are available and how to connect to them.
Step 1: Exploring the Default Gemini CLI Tools#
Out of the box, the Gemini CLI is powerful but limited to your local environment. If you open the CLI and run the /tools command, you'll see a list of its built-in capabilities.
/tools
You'll notice these are all focused on local file operations: ReadFile, SearchText, FindFiles, and so on.
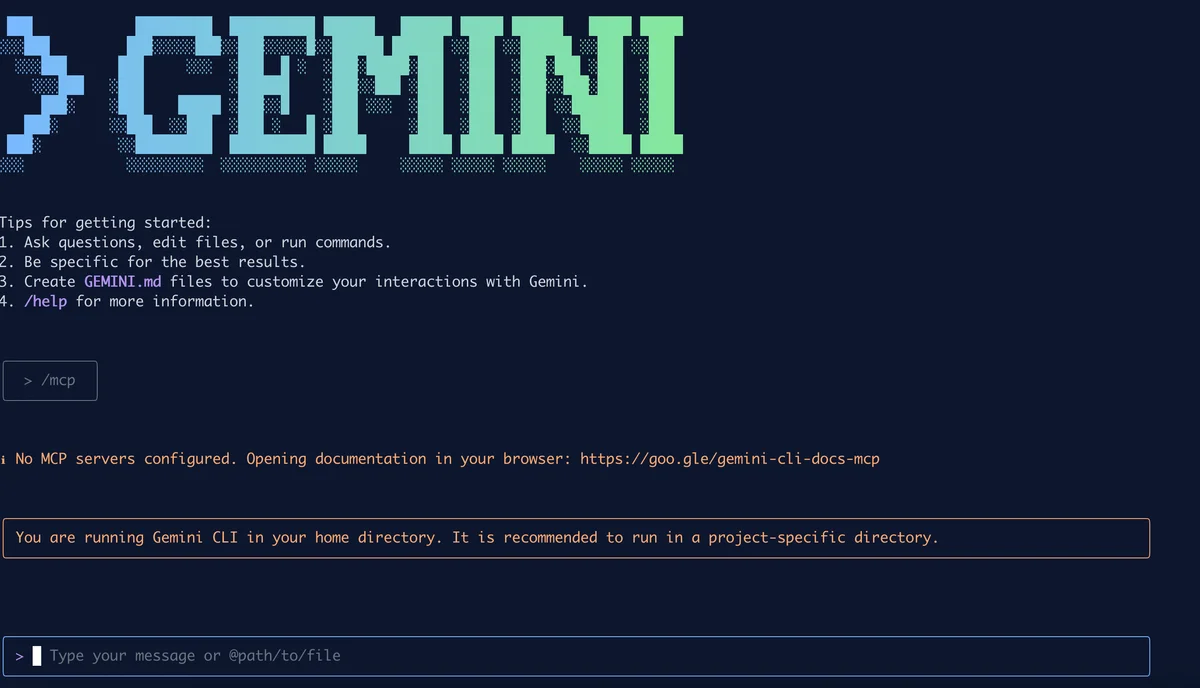
/mcp
If you try to see which MCP servers are active with the /mcp command, you'll find that none are configured yet. Let's change that.
Step 2: Configuring Your First MCP Server for GitHub#
This is where we'll do the main setup. Our goal is to edit the settings.json file to tell Gemini how to talk to GitHub. This involves two parts: getting a key from GitHub and then adding the server configuration to the file.
Generating a GitHub Personal Access Token#
First, we need to generate a secure token so Gemini can authenticate with your GitHub account.
- Navigate to your GitHub account and go to Settings > Developer settings > Personal access tokens > Fine-grained tokens.
- Click "Generate new token".
- Give your token a descriptive name, like "Gemini-CLI-Access".
- Set an Expiration date for security. 30 days is a good starting point.
- Under Repository access, choose which repositories you want Gemini to be able to read. You can select all or just specific ones.
- Scroll down to Permissions. For this tutorial, we only need one:
- Repository permissions -> Contents: Change from "No access" to "Read-only".
- Click "Generate token".
Important: Copy the token immediately and save it somewhere safe. GitHub will only show it to you once.
Updating the settings.json File#
Now, let's put that token to use. Open your Gemini configuration file and add the mcpServers object as shown below.
The configuration file is located at:
- macOS/Linux:
~/.gemini/settings.json - Windows:
%USERPROFILE%\.gemini\settings.json(typicallyC:\Users\[YourUsername]\.gemini\settings.json)
If the file doesn't exist, create a new file at the appropriate location for your operating system.
{
  "theme": "GitHub",
  "selectedAuthType": "oauth-personal",
  "mcpServers": {
    "github": {
      "command": "npx",
      "args": [
        "-y",
        "@modelcontextprotocol/server-github"
      ],
      "env": {
        "GITHUB_PERSONAL_ACCESS_TOKEN": "PASTE_YOUR_GITHUB_TOKEN_HERE"
      }
    }
  }
}
Let's quickly break down what this does:
- "github":
{ ... }: This defines a new MCP server named github. - "command": "npx": This tells Gemini to use npx to run the server package.
- "args":
[ ... ]: These are the arguments passed to the command. Here, we're telling it to run the @modelcontextprotocol/server-github package. - "env":
{ ... }: This sets the environment variables for the server. We create the GITHUB_PERSONAL_ACCESS_TOKEN and paste in the token we just generated.
Save the file, and you're ready to go!
Step 3: Verifying the Integration and Running a Query#
Now for the fun part. Relaunch the gemini CLI. You should immediately see a message indicating that it's "Using 1 MCP server."
To verify everything is working, run the /mcp command again. This time, you'll see that the github server is "Ready" and you have access to over 26 new tools, like create_pull_request, get_issue, and search_repositories.
Let's test it with a real-world example. In the example below, I asked Gemini to check a dependency version in one of my private repositories:
Which n8n demo version library I'm using in my dm3coder/llmx.de website?
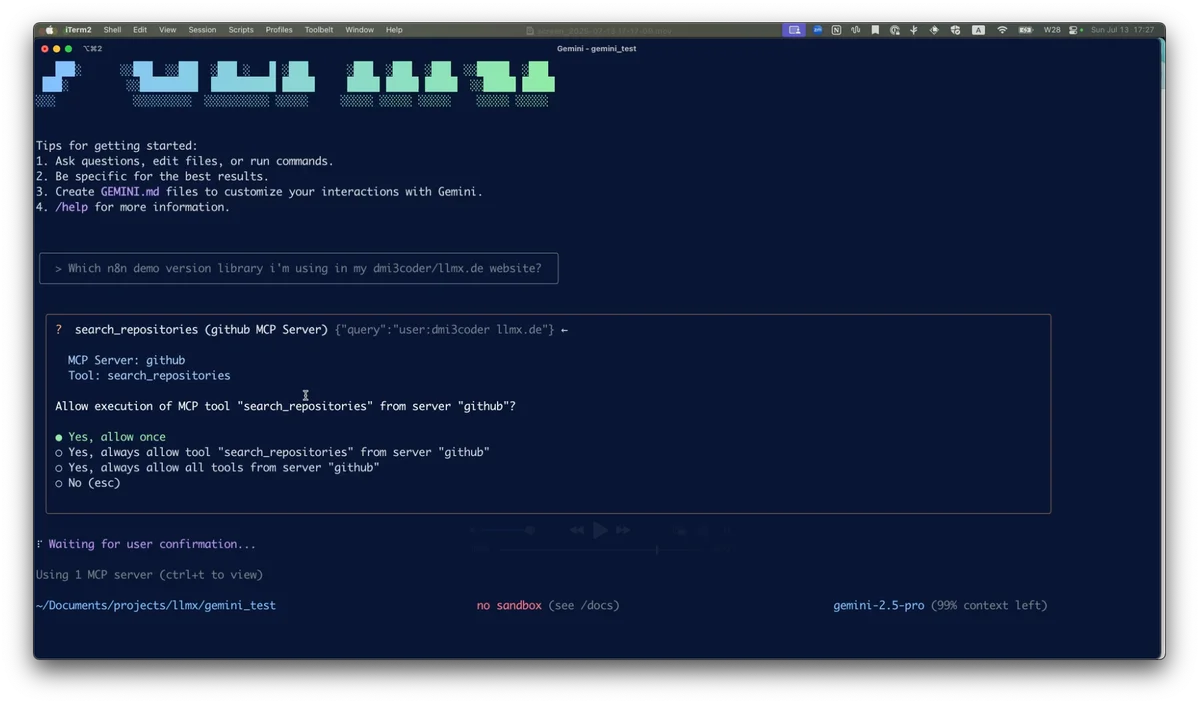
Gemini will now prompt you for permission to use the new GitHub tools. Once you approve, it will:
- Use the search_repositories tool to find the correct repository.
- Use the get_file_contents tool to read the package.json file.
- Analyze the contents and give you a precise answer.
Just like that, you've successfully used the Gemini CLI to read data from a private GitHub repository using natural language.
Frequently Asked Questions#
Gemini CLI & Model Context Protocol - Frequently Asked Questions
Conclusion#
By leveraging the Model Context Protocol, you can dramatically expand the capabilities of the Gemini CLI, turning it from a local utility into a powerful hub that can interact with all your essential developer services. This simple configuration process unlocks a new level of workflow automation, allowing you to query repositories, check on pull requests, and much more, all without leaving your terminal. You've now officially supercharged your command-line environment.